Categories
Match Analysis

A League Grand Final 2020/21: Melbourne City vs Sydney FC – tactical analysis

Venue: AAMI Park, Melbourne

Date & Time: 27 June, 5.05pm

Round No: A-League Grand Final

Attendance: 14,017

Melbourne City won their first ever A-League Championship after coming from behind to beat Sydney FC 3-1 in front of the home crowd. Both teams were without some of their best players who were away on international duty and it proved to be a great chance for youngsters like Marko Tilio, Stefan Colakovski, Nathaniel Atkinson, Joel King and Paulo Retre to make a mark. City came out really strong at home with character and attitude as they’ve shown throughout the season and were straight into its full throttle.

Sydney managed to open the scoring in the 21st minute and City equalized just after two minutes. From the 35th minute, Sydney was one man down as Luke Brattan was red carded, which turned the game into City’s favour.

This article is a tactical analysis of the game between Melbourne City and Sydney FC. I have analyzed the tactics that were used by both teams.
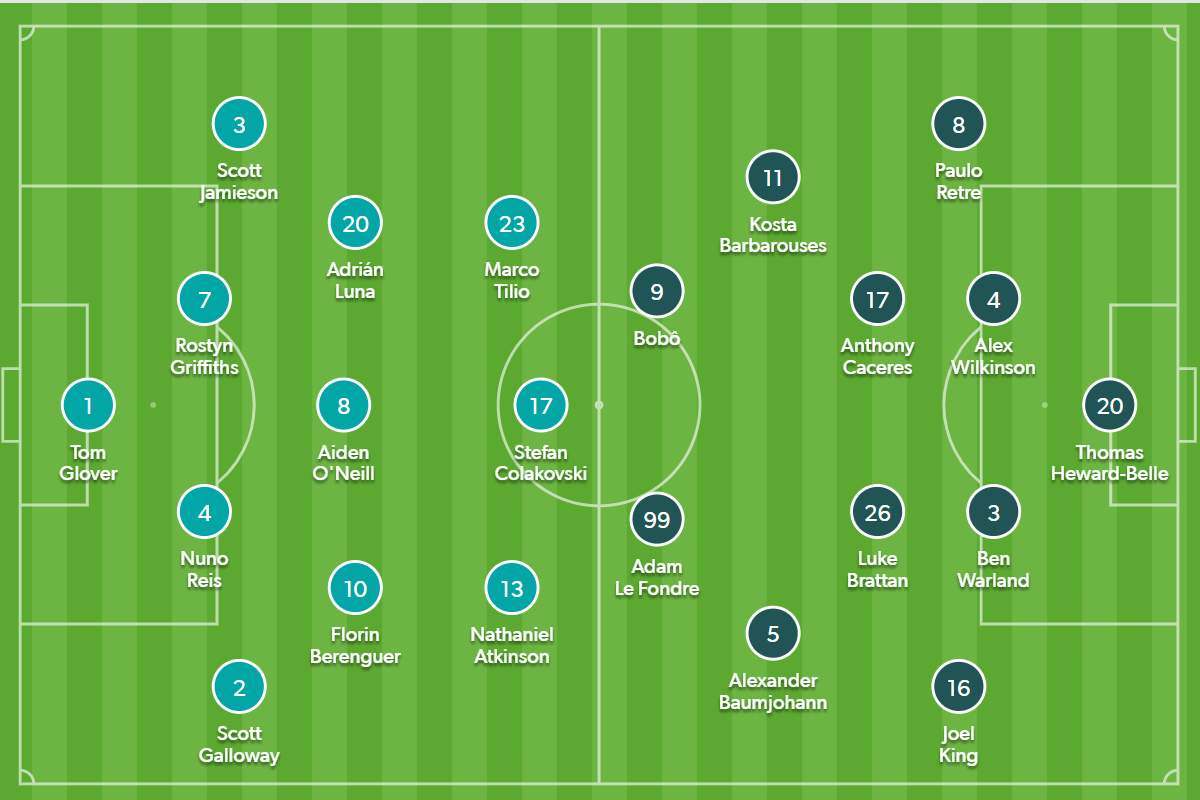
Line-ups

Melbourne City: 1-4-3-3 | Sydney FC: 1-4-2-2-2

Manager: Patrick Kisnorbo|Manager: Steve Corica

Patrick Kisnorbo set up his team in their usual 1-4-3-3 formation and made no changes from last match to the starting line-up. While Steve Corica also stuck to his usual formation 1-4-2-2-2 and made no changes to the starting line-up from the previous match.

Sydney out of possession vs City in possession 

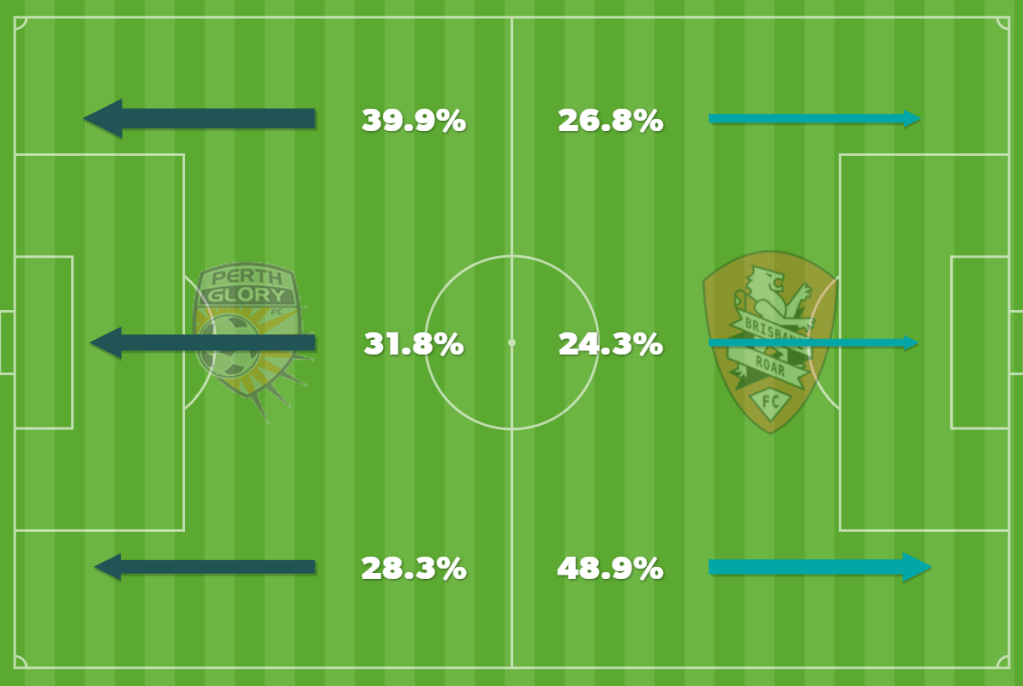
This was a game of the league’s best attack (Melbourne City) vs best defence (Sydney FC). It was good to see both teams sticking to their playing style and do what they do best.

Sydney set up in a mid-block 4-2-2-2 shape while defending
in which the attacking midfielders Barbarouses and Baumjohann would tuck inside. They have conceded the least amount of goals (27 goals in 28 matches) in the whole season. Sydney is not a high pressing team as they like to stay on the edge of the middle third and allow the opposition to come out with the ball. They are ranked third-last on the number of pressures applied in the opponent’s half (15 per match at a success rate of 40%) which is below the league average (17 per match).

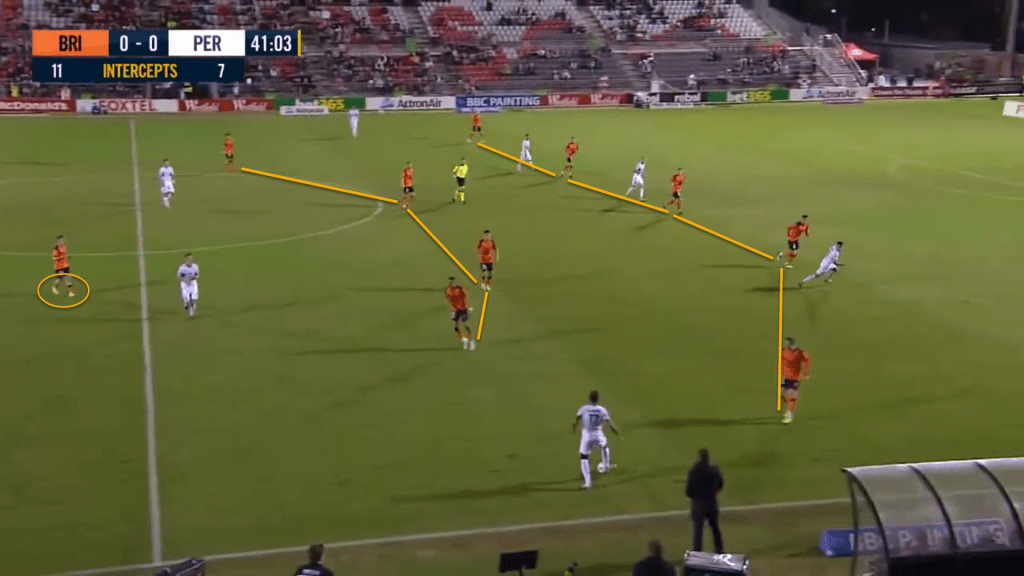
Sydney kept a compact mid-block structure, not allowing City to play through the middle. The strikers Bobo and Le Fondre would position centrally, cutting off any passes through the centre. Attacking midfielders, Barbarouses and Baumjohann would position themselves in the half-spaces blocking the passes out wide and would be ready to press if the centre-backs dribble with the ball forward.

Whenever City was able to progress the ball, Sydney retreated into a compact low-block. Hence, they were able to maintain their defensive compactness both horizontally and vertically. When in a low block, Sydney used a space-oriented man coverage (hybrid of zone and man marking) and if City were able to enter the coverage zone with the ball, they would quickly try to press the ball carrier. Sydney tried to force City to play wide and when this happened, the whole team would shuffle across to not allow the opposition to play through the wings.

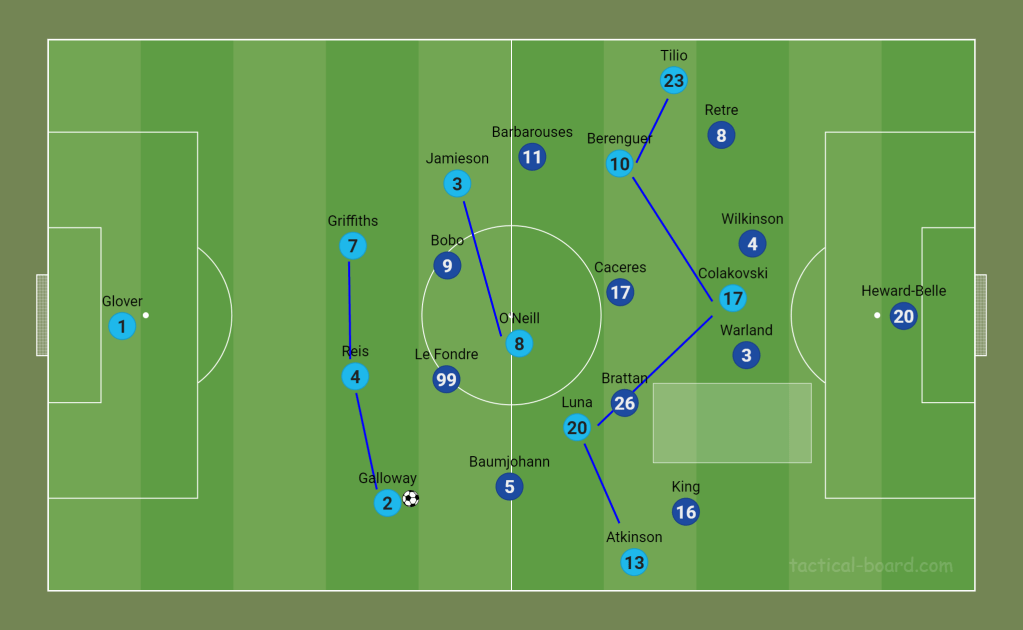
Melbourne City looked to build-up play from the back in a
2-3-5 shape. In this tactical structure, Tilio and Atkinson were instructed to stay very wide, hugging the sideline which would pull the opposition fullbacks Retre and King out of the positions and created a bigger space in the half-spaces between Sydney’s centre-backs and full-backs. Thus, Luna and Berenguer could operate in those half-spaces and create a positional front five versus a four-man defensive line of Sydney.

When Luna and Berenguer moved up into the half-spaces, which
would leave big gaps in midfield and to cover them, Jamieson and Galloway would play as inverted fullbacks.

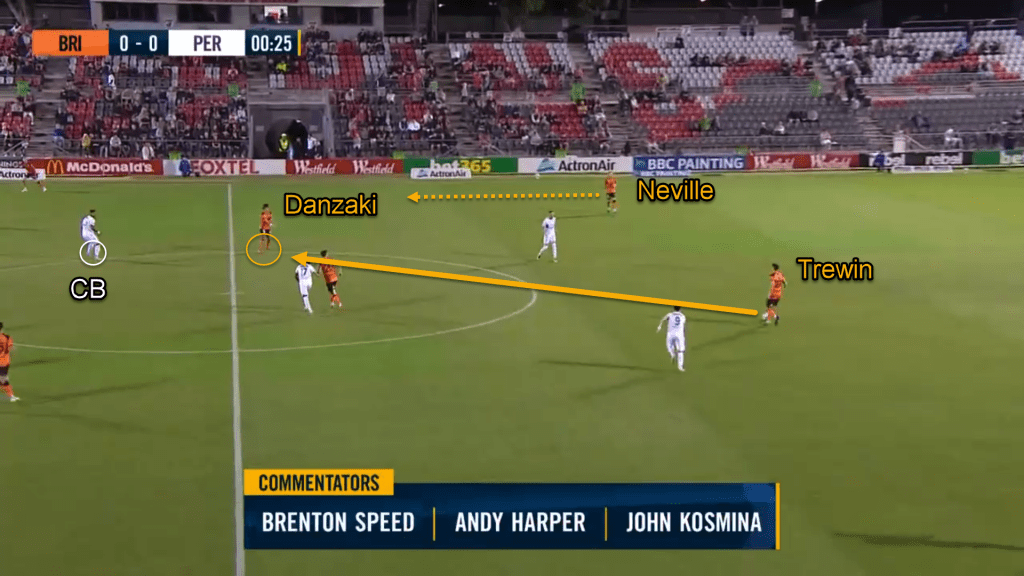
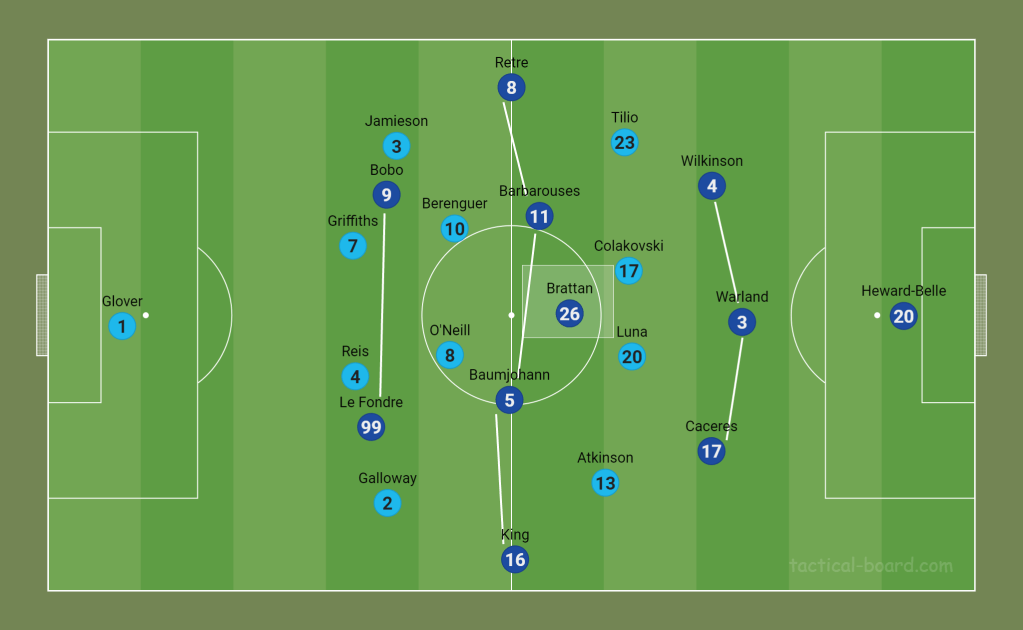
Initially, City found it a bit difficult as Sydney pressed with Bobo and Le Fondre against their two centre-backs. So, Galloway started operating a bit deep with the two centre-backs to create a back three which created a numerical superiority against the first line of press. Thus, Baumjohann had to follow Galloway and press higher. As you can see in the below picture,  a lot of space started opening up between Warland and King.

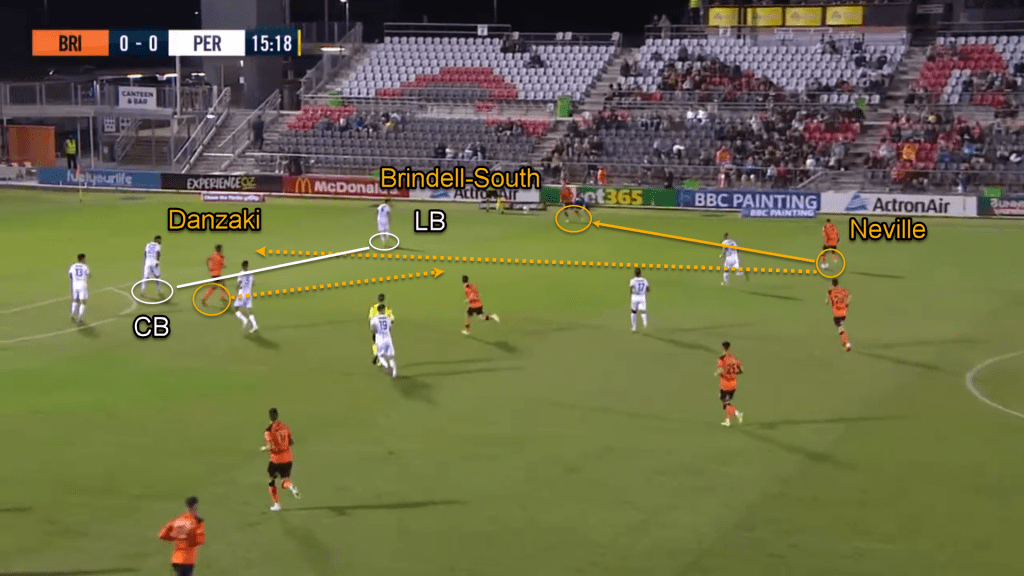
Thus, City’s build-up play shape switched to a 3-2-5 where in Jamieson also started playing more centrally. Then Atkinson started to operate more centrally to exploit that space between Warland and King which allowed more space for Galloway on the right flank to overlap and create a 2 v 1 against King as Baumjohann could not keep up with Galloway’s movement and speed.

The above video shows you an instance when Galloway made an overlapping run to provide a passing option to Atkinson due to which King got caught in two minds of whether to close down Atkinson or stop the pass out wide. The same instance shows you that Baumjohann was not able to keep up with Galloway and allowed him to run free.

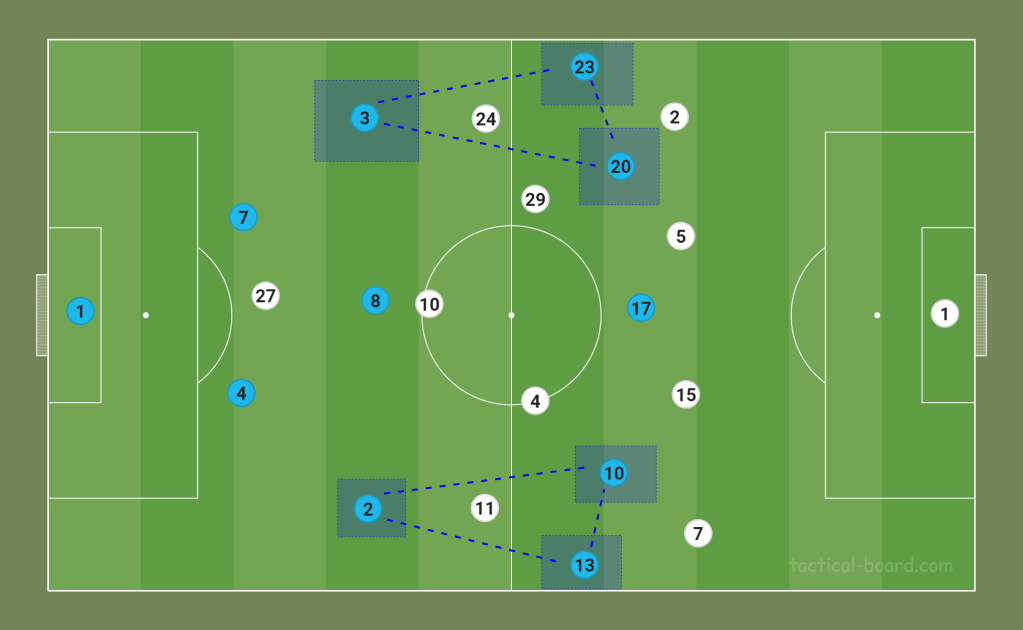
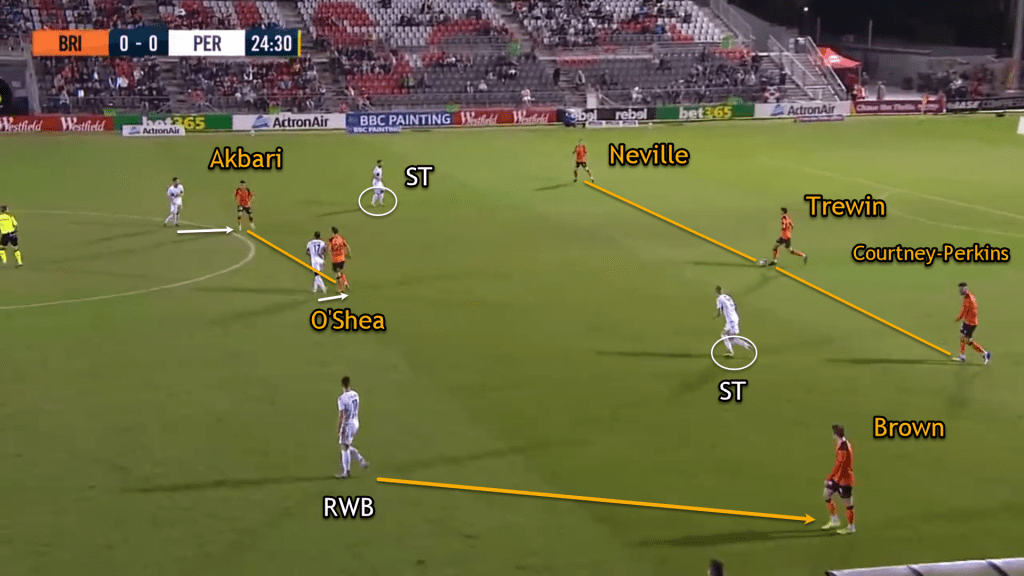
As you can see in the below picture, City created triangles in the wide areas which involved a full-back, winger and attacking midfielder, trying to open the compact defensive block of Sydney.

All three players rotated amongst themselves and made sure all three spaces were always filled. The rotations in the wide areas helped in the progression of the ball smoothly into the middle and final third because of the poor defensive attributes of Sydney’s attacking midfielders, which led to easy penetration.

Watch the above video to get a glimpse of how City’s players rotate in the wide areas and how because of their movement they could drag all Sydney midfielders out wide to the flank which created a big gap in the centre.

Sydney in possession vs City out of possession

Melbourne City defended in a mid-block 4-2-4 shape. The wingers Atkinson and Tilio operated in the half-spaces and used their shadow to cover the Sydney full-backs. Luna joined Colakovski to lead the first line of press, positioned themselves centrally to stop Sydney to progress through the centre and force the opposition to play wide.

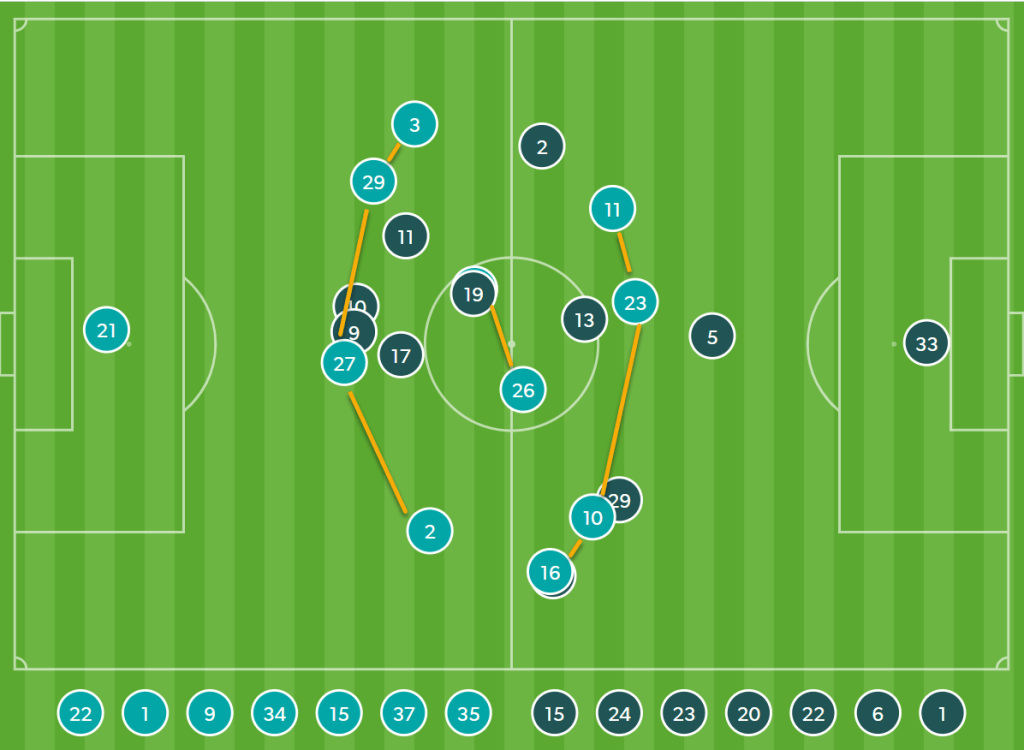
In possession, Sydney used a 3-1-4-2 shape in which Caceres or Brattan would drop in next to the centre-backs to form a back three, while the other would be present in front of the back three as a single pivot. The formation of a back three created more passing options for the defenders. King and Retre operated high and wide, providing the width. Barbarouses and Baumjohann were given the license to free roam and drift wide. Bobo and Le Fondre operated between the City full-backs and centre-backs, which kept them both engaged. Thus, City full-backs could not press King and Retre out wide.

Watch the above video and see how the movement of Barbarouses (drifting in from the toucline) allowed Sydney to play through City’s narrow defensive block.

Red card to Brattan

It seemed to be an interesting tactical battle until it was 1-1 and then Brattan received a second yellow card in the 35th minute, which meant that Sydney will be a man down for the remainder of the contest.

Steve Corica replaced Bobo with Van Der Saag. Retre moved into midfield with Caceres and Van Der Saag took Retre’s position. Sydney had to change their shape to a 4-2-3, it became harder for them to maintain a compact defensive block because City’s rotations in midfield and movement of midfielders in between the lines. So, City dominated the play comfortably and played through Sydney’s low defensive block easily.

Created using: InStat Australia | https://football.instatscout.com/

Instagram Id: https://www.instagram.com/instat_au/?hl=en

&

Once Video Analyzer Pro by Once Sport | https://www.once.de/once-video-analyser-pro/

Categories
Match Analysis

A League 2020/21: Melbourne City vs Macarthur FC – tactical analysis

Venue: Netstrata Jubilee Stadium, Sydney

Date & Time: 20 June, 4.05pm

Round No: A-League Semi-Final 2

Attendance: 2283

Melbourne City defeated Macarthur FC 2-0 to make it to the A-League Grand Final for a second consecutive time. It was really good to see youngsters like Stefan Colakovski and Marco Tilio step up and fire City into the Grand Final. City’s remarkable win was sealed by these young guns before the hour mark in the absence of Jamie Maclaren, Curtis Good and Connor Metcalfe.

This article is a tactical analysis of the game between Melbourne City and Macarthur FC. I have analyzed the tactics that were used by both teams.

Line-ups

Melbourne City: 1-4-3-3                        Macarthur FC: 1-4-2-3-1

Manager: Patrick Kisnorbo                   Manager: Ante Milicic

City set up in their usual 1-4-3-3 formation in which Andrew Nabbout made way for Nathaniel Atkinson as the right winger.

While Macarthur also lined up in their preferred 1-4-2-3-1 formation and made three changes. Loic Puyo replaced Moudi Najjar, Benat Etxebarria replace James Meredith and Matt Derbyshire led the attack, replacing Michael Ruhs.

Melbourne City’s build-up & attacking play vs Macarthur’s pressing & defensive organisation

Melbourne city used a positional front five versus a four-man defensive line of Macarthur. Macarthur used a four-man defensive line to cover the full width of the field which meant they would conceded more space in the wide channels or the wingers and midfielders had to work harder to cover the gaps by shuffling across.

All players were given different levels of freedom in this structure. The CBs and the lone central defensive midfielder had a fixed position. While the full backs, wingers and attacking midfielders were given the permission to rotate, keeping the shape of a wide triangle on both flanks, provided all these three spaces were always filled. The occupation of these spaces helped in the progression of ball into the middle and final third smoothly and with because of poor positioning of the opposition, it led to easy penetration.

As the players within the triangle were free to rotate, each of them occupied a space more regularly than the others. Marco Tillio (23) and Nathaniel Atkinson (13) were the wide wingers, Scott Galloway (2) and Scott Jamieson (3) operated as inverted fullbacks and Florin Berenguer (10) and Adrian Luna (20) played more as  high “10s” in the half spaces. City favoured the left flank more to perform this wide rotation as 48% of the attacks came from that flank while only 35% of the attacks came from the opposite flank.

City players were always positioned well and ready to do damage throughout the width of the field, as they always looked to attack the spaces left open by the opposition. For the larger proportion of the game, City were attempting to score against a deep and packed defence.

Macarthur pressed in a mid to high block 4-2-3-1 structure. As City looked to play through the flanks to progress into the final third, Macarthur would shift across to overload the flank, forcing City to go back or go long. The Macarthur defensive midfielders (29 & 4) used their shadow to cover the attacking midfielders (20 & 10) of City. Often, Puyo (10) joined the press with Matt Derbyshire (27) to stop the switch of play and used his shadow to cover Aiden O’Neill (8).

Macarthur overloaded the flank pretty well (by shuffling across) through which the attack would be initiated by City but this would also mean City players were left unmarked on the opposite flank, giving an opportunity to switch the play to the underloaded side. City started switching the ball more, which forced Macarthur to sit back rather than pressing high and shuffling from side to side.

City exploited the space between the opposition’s defensive midfielders well. Luna and Berenguer’s movement caused problems for Macarthur in the midfield and would create space for Colakovski to drop in to receive the ball which would force the opposition’s centre-backs to make a decision of whether to step up and press or leave the gap behind open. After realising that the opposing centre-backs were not dropping, Colakovski would stay up high to create space for Luna to drag the opposition midfielder around and receive the ball facing forward.

Macarthur’s build-up & attacking play vs Melbourne City’s pressing & defensive organisation

Ante Milicic deployed a 3-4-2-1 structure while building up from the back because a structure with a back three provides a lot more angles and passing lanes, which increases the variety in which they could build up from the back. Their aim was to achieve numerical superiority in the first phase of play.

Macarthur’s build-up play was slow and patient as they looked to facilitate safe progression from the back. There were usually 7-8 players involved in the build-up play which made it very difficult for opposition to press with equal numbers thus, City had to commit a lot of players high up the pitch to press them.

Franjic (7) would tuck in on the left side next to the centre backs to form a back three. Benat and Martis operated as the double pivot in front of the three centre backs with a staggered positioning while Tommy Oar and Jake McGing provided the width acting as wingbacks. Puyo and M’Mombwa played as inside forwards in between the lines just behind Derbyshire, who led the attack for Macarthur.

To aid in the build-up play, Federici (1) would often step up and position himself next to Susnjar to form a back four. They used Federici as a sweeper keeper to keep the ball moving as he was the free player in the defensive third. This created an overload against City’s first line of press, making it easier to pass the ball forward. It helped in stretching City’s first line of press. Due to width in build-up play, it became harder for City to cover the ground horizontally and increased the distance between the opposition players while pressing. Thus, City could not be compact anymore and passing lanes for Macarthur started to open up.The method of progression they will use depends on the decisions made by the opposition.

In this way the wingbacks were able to pin the City’s full backs by being extremely high and wide due to which Franjic and Milligan enjoyed time and space while in possession. Thus, 70% of the attacks for Macarthur came from the flanks.

City defended in a mid-block 4-4-2 shape, waiting for the opposition on the edge of the middle third. Luna joined the press with Colakovski, positioning centrally to cut off any progression through the centre. Tillio and Atkinson operated in the half-spaces to stop the wide play and were ready to press the opposition if the first line of press was beaten. The aim was always to block the central areas and force Macarthur to play wide. Whenever it happened, City would shuffle across and press aggressively to force a mistake from the opposition.

If Macarthur were able to progress the ball, then City would retreat into a lower block, keeping defensive compactness both horizontally and vertically. City players would be at a very short distance to each other, reducing passing lanes, which gave more opportunities to press the ball carrier aggressively. They applied a space-oriented man-marking scheme which meant that they kept the compactness and players would pressure the opponents if they entered their zone with the ball.

City’s defensive transition vs Macarthur’s offensive transition

During transition from attacking to defending phase, City would look to press on the ball with one or two players while the rest of the team would move into a man-marking scheme to close down any access point the ball carrier might have. City has players who are excellent in challenging for the ball hence they forced the opposition to commit a mistake.

Macarthur always looked for the long escape pass to Derbyshire when they were transitioning from defence to offence. Derbyshire acts as the focal point of attack for Macarthur to control the ball and bring others into play.  Macarthur usually attacked with 3-4 players and the others would step up to condense the space behind them.

City’s offensive transition vs Macarthur’s defensive transition

City were lightning quick on offensive transitions and they got both the goals as a reward for it. They always looked to play the first pass out of pressure to Colakovski, Tillio, Atkinson or Luna who would make runs in behind the opposition’s defence line as they tried to create space for the others to join the attack. City took advantage of the spaces generated in between Macarthur’s defensive structure and looked for verticality. Macarthur always looked to counter press aggressively for a few seconds with one or two players in defensive transitions and the defenders would start dropping off which left big gaps in midfield.

To counter that City attacked with 4-6 players and at a quick pace as they looked to move the ball forward and diagonally. Sometimes they also tried to combine play with short passes in midfield to drag the opposition players in and then play a long pass out to one of the forwards.

Created using: InStat Australia | https://football.instatscout.com/

Instagram Id: https://www.instagram.com/instat_au/?hl=en

&

Once Video Analyzer Pro by Once Sport | https://www.once.de/once-video-analyser-pro/

Categories
Player Analysis

A-League 2020/21: Connor Metcalfe – scout report

Connor Metcalfe has been ranked 9th amongst the top players by InStat in the A-league. He has had an excellent season, helping Melbourne City FC to reach the Final Series as they push for a maiden A-League title. Although he hasn’t been able to play in the Final Series, but because of his development and consistent performances in 2020-21, he got his first call-up to the Socceroos for the World Cup Qualifiers.

Stats in the A-League season 2020/21:

Matches played – 29 | Starts – 26 | Minutes played – 2316
Goals scored – 6 | Assists – 3
Passing accuracy – 89%
Key passes per match – 0.8
Challenges won per 90 – 53%
Air challenges won per 90 – 62%
Dribbles success rate per 90 – 70%
Successful tackles per 90 – 67%
Shots per 90 – 1.57

He has started most of his matches as a defensive midfielder in a double pivot for City. The below touch map gives you a perfect picture of his work rate due to which he has turned into one of the best box-to-box midfielders in the A-League. He helps the team in build-up play, defending, launching counter attacks and attacking by making forward runs.

The 21- year-old midfielder’s ability to play in between the lines and linking-up play is exceptional, because of which he is able to open up space for others and pull players. The above picture also shows us his presence in between the lines, especially in the middle and final third. His overall game has really developed well which has been displayed in his league form, displaying power, pace and an eye for creativity operating as a key cog for City.

The above video is a short highlights reel of Connor Metcalfe which consists of his goals scored, assists, playmaking skills, actions during transitions and periods of defending.

Created using: InStat Australia

Categories
Team Analysis

A-League 2020/21: Brisbane Roar FC – tactical analysis vs Perth Glory FC

Venue: Moreton Daily Stadium, Queensland

Date & Time: 02 June, 7.05 pm

Round No.: 23

Attendance: 3879

Brisbane Roar secured a spot in the A-League Final Series for the 10th time in the last 11 seasons with a 2-1 win over Perth Glory. This result also meant that Perth Glory won’t be able to make it to the top-six this time.

Both teams came into the game needing those three points to secure or still have a chance to make it into the top-six. Going into the half-time break locked in at 0-0, Brisbane broke the deadlock because of an own goal scored by Jonathan Aspropotamitis in the 51st minute. Riku Danzaki doubled the lead for Brisbane in the 73rd minute by finishing a rapid counterattack. Later on, Perth was hoping to turn around the deficit as they got their first goal in the 85th minute, but Brisbane was able to hold on to their lead for the final few minutes and guaranteed themselves a spot in the Final Series.

In this tactical analysis, I will analyze Brisbane Roar’s tactics against Perth Glory.

Line-ups

Brisbane Roar FC: 1-3-4-2-1                                  Perth Glory: 1-4-2-2-2

Manager: Warren Moon                     Head Coach: Richard Garcia

Brisbane Roar lined up in a 1-3-4-3 formation in which Warren Moon made four changes. In defence, Jordan Courtney-Perkins made his way into the starting line-up, replacing Macaulay Gillesphey. In midfield, there were two changes that were made. Riku Danzaki came in place of Alex Parsons and Jay O’Shea replaced Jesse Daley. Lastly, Dylan Wenzel-Halls led the attack for Brisbane coming in for Cyrus Dehmie.  

Average Position

Brisbane Roar in light blue and Perth Glory in dark blue

By analyzing the average position of Brisbane Roar, it looks like they were set up in a 4-2-4 structure. In possession, the two midfielders staggered their positioning. Rahmat Akbari stayed in front of the centre-backs and provided them with passing options in behind the opposition’s first line of press. Jay O’Shea stayed a bit higher to provide passing options in between the lines and positioned himself behind Wenzel-Halls. Joseph Champness operated like an inverted winger, provided the width and at times came infield to get in between the opposition centre-back and full-back. Corey Brown operated mostly as a deep full-back, which gave Scott Neville license to join the attack.

Attacking Thirds

If you look at the above image and relate it to the previous picture, it is pretty clear that Brisbane preferred the right flank as 48% came from that side. The Roar overloaded the flank with Neville, Danzaki and Brindell-South, combining well and linking-up play. The trio isolated Darryl Lachman and Kosuke Ota in a 3 v 2 and tried to go round or from in between them to get into the penalty box.

Pressing

In possession, Perth set up in a 3-5-2 structure with three centre-backs, wing backs high and wide, a double pivot and Diego Castro as the no. “10” behind the two strikers Bruno Fornaroli and Andy Keogh.

The Roar are known for their structured and intense pressing. Against Perth, they set up in a mid-block 5-2-2-1 structure in which Wenzel-Halls led the press. Perth kept 60% of the possession trying to find a way through the Brisbane’s defence. Now, let’s have a look at the Roar’s pressing.

Wenzel-Halls was instructed to stick with the CB. In this way Perth could not switch play from the back and the far sided CB would be out of the picture.

As you can see in the above picture, Champness is pressing the RCB and using his shadow to cover the RDM. In the meantime, Danzaki would tuck in and stay close to LDM to cut out the vertical pass from the RCB. The same would happen on the other side as well. O’Shea and Akbari would stay close to the RDM and LDM to press them in case any of them peels out wide to receive the ball from the centre-backs. This would create a 4 v 2 overload in the midfield for Brisbane. The Roar did not allow Perth to build-up through the middle as they blocked all central passing lanes, which forced them to play wide or go long.

As you can see in the above picture, the ball now went out to the RWB. Brown comes out to press him and the midfielders would shift across to mark the RDM and CAM. While at the back, Brisbane kept a numerical superiority of +1 and would also shuffle across to close the gaps behind Brown.

Defending

The Roar have conceded just 28 goals in 26 matches this season, over performing their opponent’s xG which stands at 40 goals which proves they have been defensively solid.

They defend with at least 9 players behind the ball which includes the goalkeeper while Wenzel-Halls and the far sided winger stay up. The Roar defend in a unit and, shift and slide according to the play. The defence and midfield line stay close to each other.

Brisbane dropped into a 5-4-1 or 5-2-2-1 shape when they defended in which the wingbacks tucked in with the three centre backs who were protected by a midfield line of four players. Wenzel-Halls was left upfront with the task of closing down the ball side CDM. In this way, the Roar kept things tight at the back and maintain their lead over the opposition.

Build-up play

Brisbane has pleased everyone with their tactical flexibility while in possession of the ball. Although they had only 40% of the possession, they played out from the back with great confidence, crisply linking passes to keep the ball with an effortlessness that made the opposition’s forwards look like they were chasing shadows. Brisbane’s usual build-up play structure was a 3-1 shape in which either Brown would stay back along with Trewin, Courtney-Perkins to form a back three, allowing Neville to push up or vice versa. They would be supported by Akbari as the single pivot.

The defenders never agitated even after being put under immense pressure by the opposition forwards and midfielders. There was always an option open, be it short or a long outlet to open up Perth’s flanks.

Perth defended in a mid to low block 4-2-2-2 shape. Their strikers were tasked with pinning the three centre-backs of Brisbane. The strikers stayed close to the Neville and Courtney-Perkins of Brisbane and allowed the Trewin to be free. When Trewin had the time and space to drive, then Perth’s strikers would curve their run from out to in to press him and use their shadow to cover the Neville and Courtney-Perkins. Perth was forcing Brisbane to play through the centre.

Brisbane’s back three was supported by a double pivot of Akbari and O’Shea in front of them. Both were man-marked by Perth’s midfielders and followed them everywhere they moved. Brisbane’s wide back three created a disjoint between Perth’s forwards due to which they had to cover a lot of ground to press Trewin. This allowed Trewin a lot of time on the ball.

Attacking rotations

Often, Danzaki dropped in between the lines to provide a passing option to his defenders. Due to Perth man-marking the Brisbane midfielders, the CB was dragged by Danzaki till the halfway line like in the above picture and some other player would take Danzaki’s place. In this way, to disorganise the opposition, Brisbane’s midfielders kept on rotating.

As you can see in the above picture, Neville plays the pass to Brindell-South and makes underlapping run while Danzaki moved into the half space between the opposition CB & LB.

The above wide rotations happened several times in the match as Brisbane was targeting the space between the opposition left centre-back and left back.

Attacking play

Warren Moon has improved Brisbane’s attacking play this season. As compared to last season’s 1.14 goals per match, the team has scored 1.37 goals per match this season. However, they have slightly underperformed their xG of 41 goals and have scored only 37 this season.

Brisbane relied more on direct play after they were able to build-up from the back. The defenders looked to play diagonal long passes into the wide channels, looking to hit the wing backs.

While Brisbane sat deep during spells of opposite possession, they looked very dangerous on the counter-attack and got their reward in the 73rd minute when Dabzaki scored as you can see in the above video. Their aim was always to move the ball quickly with fast combination play to draw opposition players in which would create space out wide on the flanks to spring counter attacks. Brisbane tend to create space centrally as well for the attackers to roam in while their overlapping full-backs and wing-backs come in to play.

The likes of Champness and Danzaki are vital for such a style of play as they are excellent at carrying the ball upfield at pace while the wingbacks, Brown and Brindell-South provided support from wider areas. Wenzel-Halls, who with his exceptional work rate, led the front line and kept the central defenders occupied.

Along with these players, one of the central midfielders, usually O’Shea, would push up to join the attack while Akbari would stay back to guard the defenders. In this match, it proved to be an extremely effective way for them to create chances and score goals.

Created using: InStat Australia | https://football.instatscout.com/

Instagram Id: https://www.instagram.com/instat_au/?hl=en

&

Once Video Analyzer Pro by Once Sport | https://www.once.de/once-video-analyser-pro/