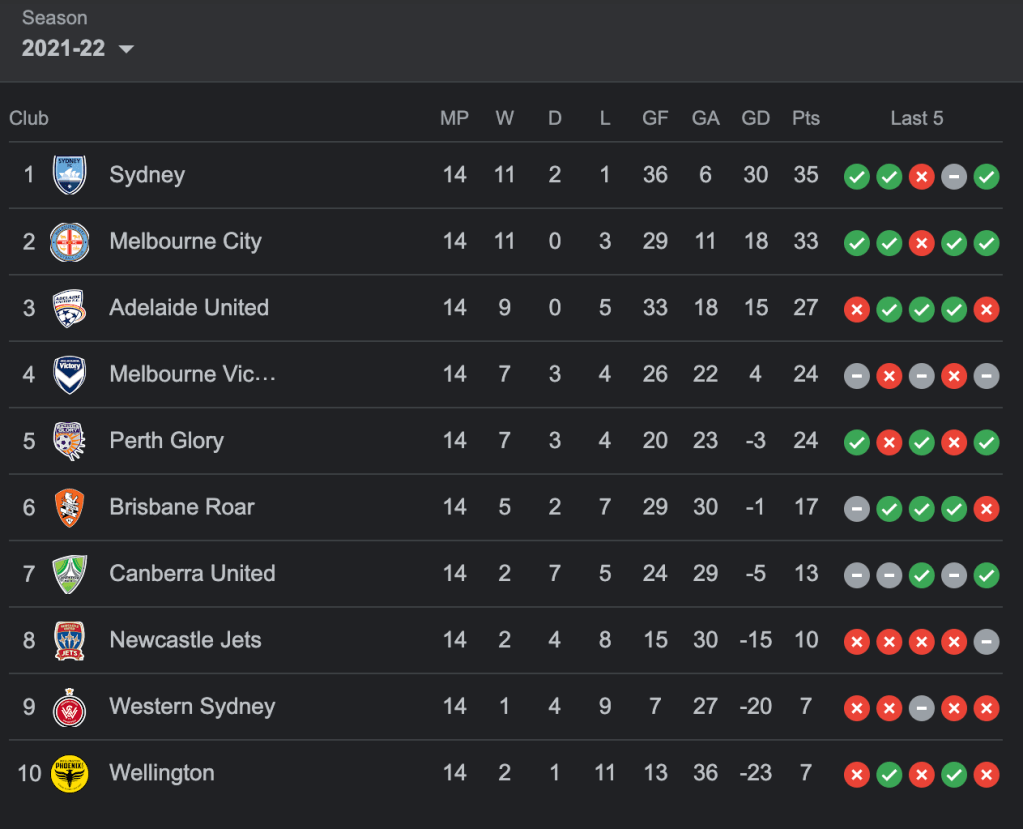
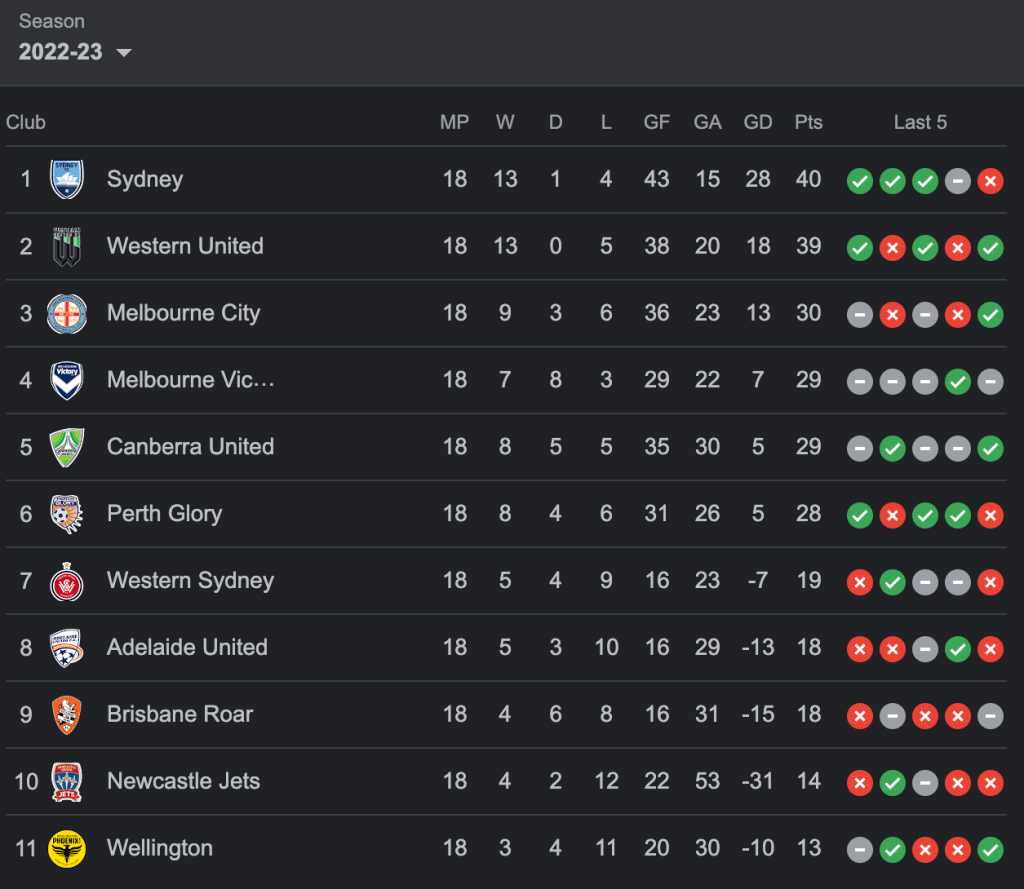
This article provides a comprehensive comparison of Melbourne Victory Women’s attacking play in the A-League Women’s season 2021-22 and 2022-23. The use of metrics and graphs will help illustrate the differences between the two seasons.
Melbourne Victory finished 4th in the regular season on the ladder in both the seasons. I have outlined 9 different metrics to compare the attacking play of the team in both seasons-
Goals per 90
xG per 90
Shots per 90
Crosses per 90
Key Passes per 90
Passes to final third per 90
Touches in penalty area per 90
Forward passes per 90
Number of passes 90
In the 2021/22 season, the team scored 1.9 goals per 90 whereas in 2022/23, they scored 1.6 goals per 90. The 1.9 goals per 90 in 2021/22 were scored at an xG of 1.5 per 90, which shows that they outperformed their xG. However in 2022/23 the xG was 1.8 per 90 which is higher than the previous season but they underperformed their xG & could only score 1.6 goals per 90.
Better qualities of chances were created in front of the goal in 2022/23 The team recorded 8 draws out of their 18 matches. Those draws could have converted into wins given that if they performed better in front of the goal when presented with the chances.
Lets dive deeper into how the chances were created in season 2022/23
Melbourne Victory women is known to play a mix of possession & direct style of play. Most of the times they looked to penetrate the final third by –
Find wingers 1 v 1 in the outside channels to deliver crosses into the box
The attacking midfielder making a forward run from deep getting in between opposition defensive line
The striker holds up the play to combine with the “10s” or gets in behind to receive a through/long pass
If we look at the numbers now, we can see that there was a massive increase in the number of crosses in the 2022/23 season. It went from being 13.5 per 90 to 16.7 per 90 which resulted in the team attempting more shots on goal (from 12.1 per 90 to 12.8 per 90).
Melbourne Victory had 52.17% possession on an average in the 2021/22 season which went down to 50.6% in the last season but if we compare the numbers of passes per game, it actually increased from 421.7 per 90 to 427.3 per 90. It showed that the team looked to move the ball a lot more than just holding it.
One major principle in possession that I noticed of the team was that they liked to circulate play side to side & always tried to find the right moment to progress the ball further up the field. Therefore, you can see in the above graph that there was a slight increase in the number of forward passes – from 159.8 per 90 in 2021/22 to 161.4 per 90.in 2022/23.
The numbers definitely show that there was a much more positive intent in their attacking play in 2022/23. They were a team that looked to always play through the lines but again which can mean nothing because it also depends on how the opposition sets up against them.
In my opinion, while in possession, the presence of Kayla Morrison & Alex Chidiac made up the spine of the team because of their ability to break lines by driving forward & playing the passes through the lines. As a result, we saw an increase in the number of passes into final third which went up from 51.4 per 90 to 54.7 per 90.
The number of key passes per 90 increased from 2.4 per 90 in 2021/22 to 2.9 per 90 in 2022/23. This was due to the presence of Beattie Goad who averaged 1.38 key passes per 90 & Alana Murphy – 1.42 key passes per 90. The team heavily relied on their vision & an eye for a killer pass when Alex Chidiac left after playing just 13 matches to go back to Racing Louisville in the NWSL.
In 2022/23 the team looked to get more players into the box (averaging 3 to 5) whenever they entered the final 3rd & having Melina Ayres available for about 14 games this season saw the number of touches in penalty area go up from 13.3 per 90 in 2021/22 to 17.2 per 90 in 2022/23. Her timing of runs to arrive into the box & hold-up play to bring other teammates into play was exceptional & made her the focal point of the team. She finished as the 2nd top scorer in the league just 2 goals behind Hannah Keane of Western United. Imagine if she were there for the 6 matches she missed out?
Conclusion
It will be really exciting to see how the team does in the 2023/24 season after signing the likes of Kurea Okino, Emily Gielnik & McKenzie Weinert to add more firepower to the final third
Brisbane Roar secured a spot in the A-League Final Series for the 10th time in the last 11 seasons with a 2-1 win over Perth Glory. This result also meant that Perth Glory won’t be able to make it to the top-six this time.
Both teams came into the game needing those three points to secure or still have a chance to make it into the top-six. Going into the half-time break locked in at 0-0, Brisbane broke the deadlock because of an own goal scored by Jonathan Aspropotamitis in the 51st minute. Riku Danzaki doubled the lead for Brisbane in the 73rd minute by finishing a rapid counterattack. Later on, Perth was hoping to turn around the deficit as they got their first goal in the 85th minute, but Brisbane was able to hold on to their lead for the final few minutes and guaranteed themselves a spot in the Final Series.
In this tactical analysis, I will analyze Brisbane Roar’s tactics against Perth Glory.
Brisbane Roar lined up in a 1-3-4-3 formation in which Warren Moon made four changes. In defence, Jordan Courtney-Perkins made his way into the starting line-up, replacing Macaulay Gillesphey. In midfield, there were two changes that were made. Riku Danzaki came in place of Alex Parsons and Jay O’Shea replaced Jesse Daley. Lastly, Dylan Wenzel-Halls led the attack for Brisbane coming in for Cyrus Dehmie.
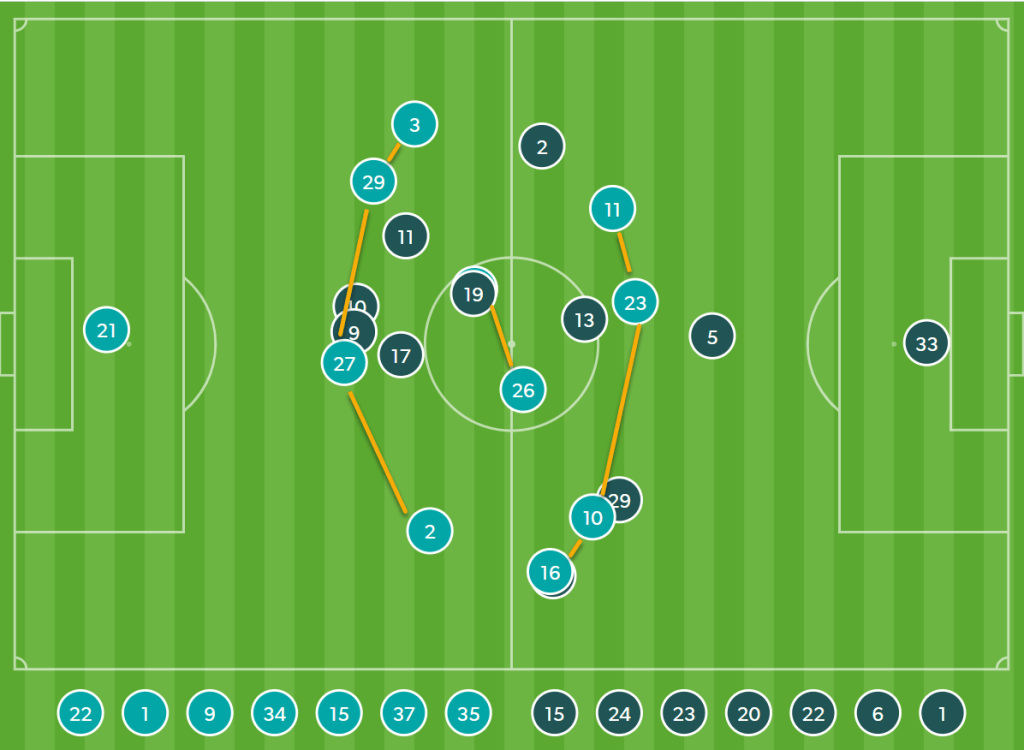
Average Position
Brisbane Roar in light blue and Perth Glory in dark blue
By analyzing the average position of Brisbane Roar, it looks like they were set up in a 4-2-4 structure. In possession, the two midfielders staggered their positioning. Rahmat Akbari stayed in front of the centre-backs and provided them with passing options in behind the opposition’s first line of press. Jay O’Shea stayed a bit higher to provide passing options in between the lines and positioned himself behind Wenzel-Halls. Joseph Champness operated like an inverted winger, provided the width and at times came infield to get in between the opposition centre-back and full-back. Corey Brown operated mostly as a deep full-back, which gave Scott Neville license to join the attack.
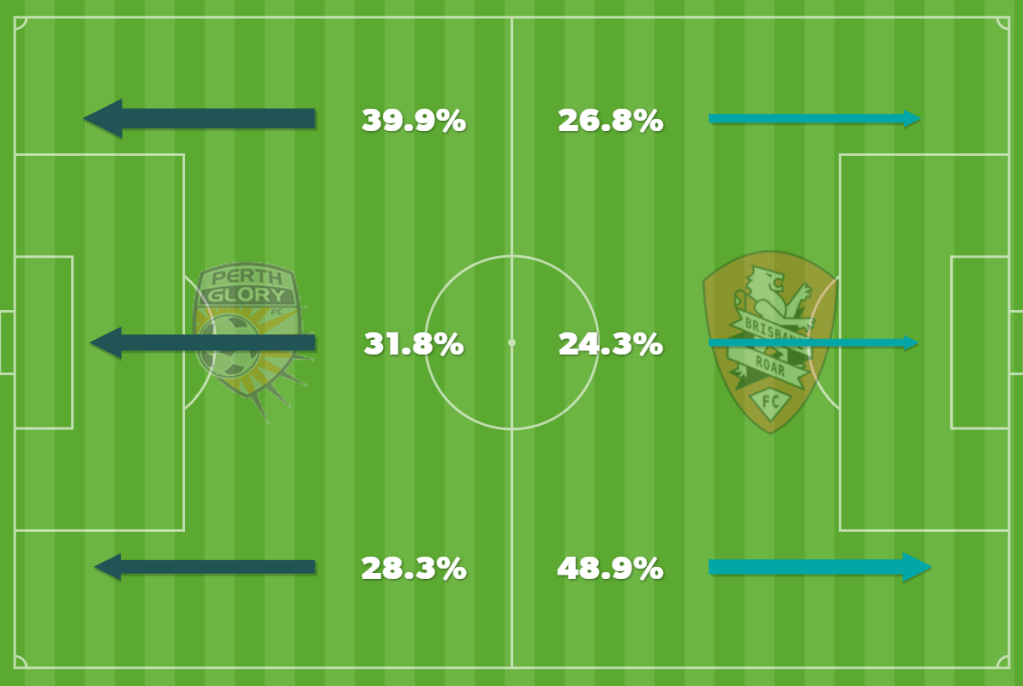
Attacking Thirds
If you look at the above image and relate it to the previous picture, it is pretty clear that Brisbane preferred the right flank as 48% came from that side. The Roar overloaded the flank with Neville, Danzaki and Brindell-South, combining well and linking-up play. The trio isolated Darryl Lachman and Kosuke Ota in a 3 v 2 and tried to go round or from in between them to get into the penalty box.
Pressing
In possession, Perth set up in a 3-5-2 structure with three centre-backs, wing backs high and wide, a double pivot and Diego Castro as the no. “10” behind the two strikers Bruno Fornaroli and Andy Keogh.
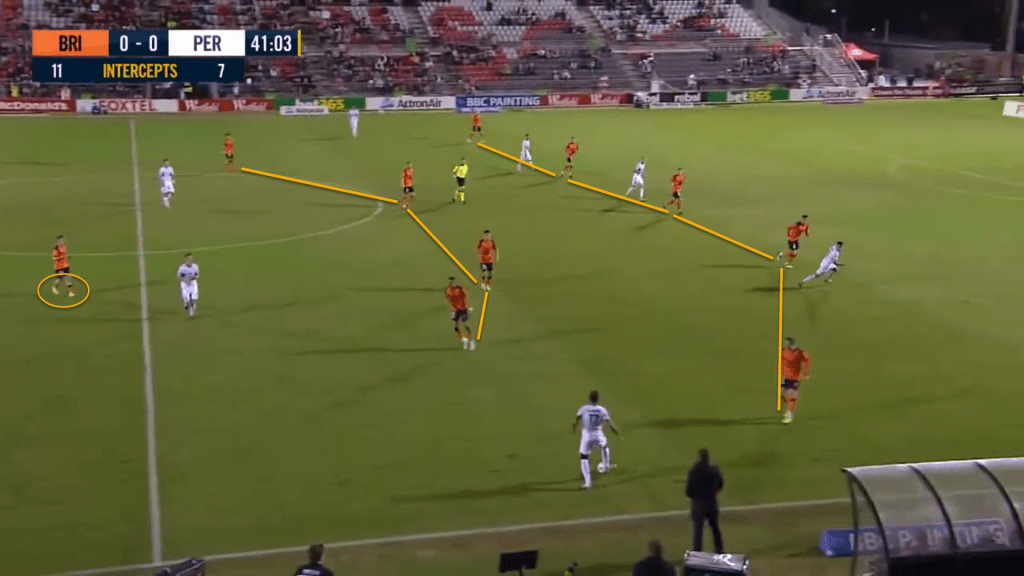
The Roar are known for their structured and intense pressing. Against Perth, they set up in a mid-block 5-2-2-1 structure in which Wenzel-Halls led the press. Perth kept 60% of the possession trying to find a way through the Brisbane’s defence. Now, let’s have a look at the Roar’s pressing.
Wenzel-Halls was instructed to stick with the CB. In this way Perth could not switch play from the back and the far sided CB would be out of the picture.
As you can see in the above picture, Champness is pressing the RCB and using his shadow to cover the RDM. In the meantime, Danzaki would tuck in and stay close to LDM to cut out the vertical pass from the RCB. The same would happen on the other side as well. O’Shea and Akbari would stay close to the RDM and LDM to press them in case any of them peels out wide to receive the ball from the centre-backs. This would create a 4 v 2 overload in the midfield for Brisbane. The Roar did not allow Perth to build-up through the middle as they blocked all central passing lanes, which forced them to play wide or go long.
As you can see in the above picture, the ball now went out to the RWB. Brown comes out to press him and the midfielders would shift across to mark the RDM and CAM. While at the back, Brisbane kept a numerical superiority of +1 and would also shuffle across to close the gaps behind Brown.
Defending
The Roar have conceded just 28 goals in 26 matches this season, over performing their opponent’s xG which stands at 40 goals which proves they have been defensively solid.
They defend with at least 9 players behind the ball which includes the goalkeeper while Wenzel-Halls and the far sided winger stay up. The Roar defend in a unit and, shift and slide according to the play. The defence and midfield line stay close to each other.
Brisbane dropped into a 5-4-1 or 5-2-2-1 shape when they defended in which the wingbacks tucked in with the three centre backs who were protected by a midfield line of four players. Wenzel-Halls was left upfront with the task of closing down the ball side CDM. In this way, the Roar kept things tight at the back and maintain their lead over the opposition.
Build-up play
Brisbane has pleased everyone with their tactical flexibility while in possession of the ball. Although they had only 40% of the possession, they played out from the back with great confidence, crisply linking passes to keep the ball with an effortlessness that made the opposition’s forwards look like they were chasing shadows. Brisbane’s usual build-up play structure was a 3-1 shape in which either Brown would stay back along with Trewin, Courtney-Perkins to form a back three, allowing Neville to push up or vice versa. They would be supported by Akbari as the single pivot.
The defenders never agitated even after being put under immense pressure by the opposition forwards and midfielders. There was always an option open, be it short or a long outlet to open up Perth’s flanks.
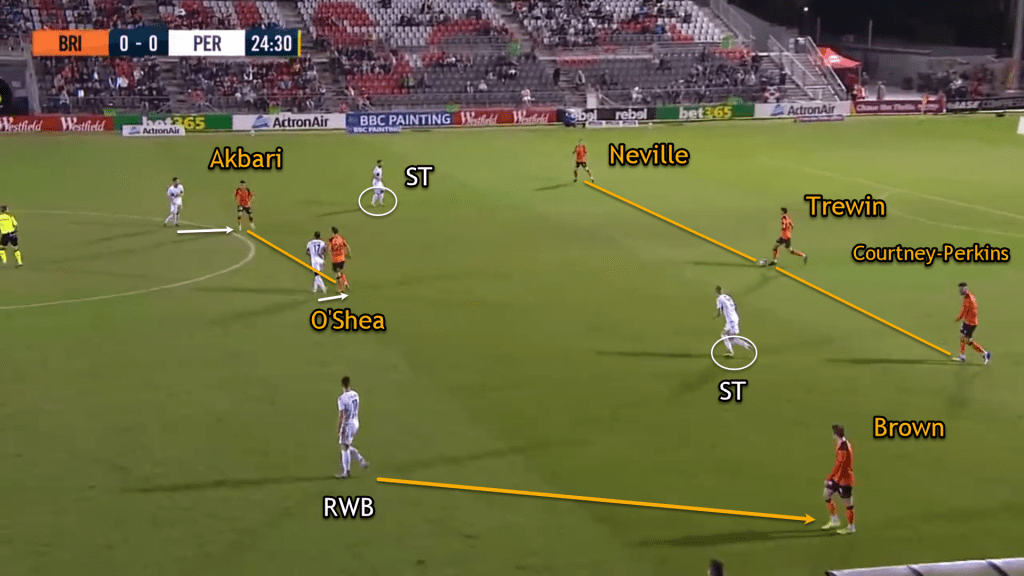
Perth defended in a mid to low block 4-2-2-2 shape. Their strikers were tasked with pinning the three centre-backs of Brisbane. The strikers stayed close to the Neville and Courtney-Perkins of Brisbane and allowed the Trewin to be free. When Trewin had the time and space to drive, then Perth’s strikers would curve their run from out to in to press him and use their shadow to cover the Neville and Courtney-Perkins. Perth was forcing Brisbane to play through the centre.
Brisbane’s back three was supported by a double pivot of Akbari and O’Shea in front of them. Both were man-marked by Perth’s midfielders and followed them everywhere they moved. Brisbane’s wide back three created a disjoint between Perth’s forwards due to which they had to cover a lot of ground to press Trewin. This allowed Trewin a lot of time on the ball.
Attacking rotations
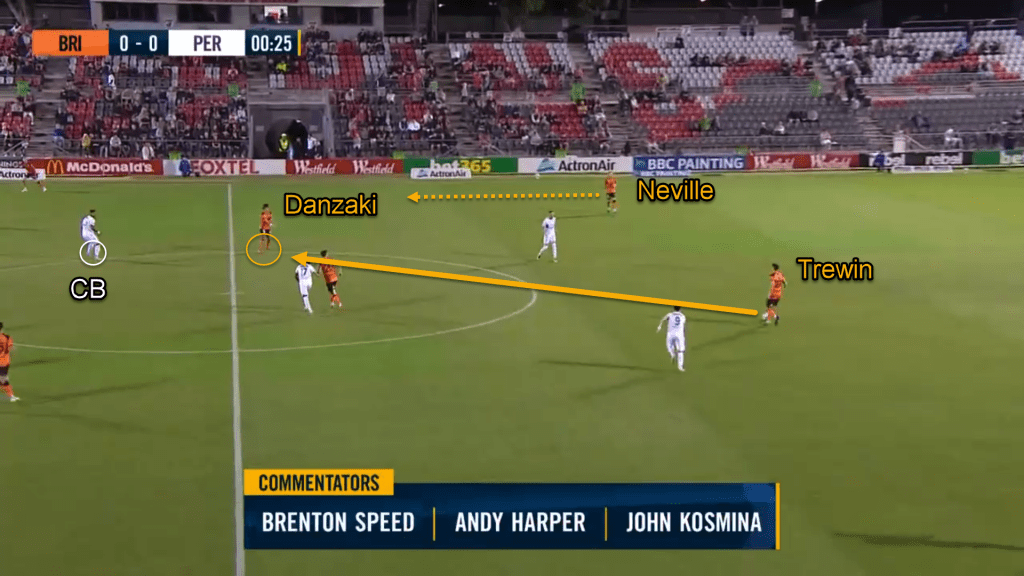
Often, Danzaki dropped in between the lines to provide a passing option to his defenders. Due to Perth man-marking the Brisbane midfielders, the CB was dragged by Danzaki till the halfway line like in the above picture and some other player would take Danzaki’s place. In this way, to disorganise the opposition, Brisbane’s midfielders kept on rotating.
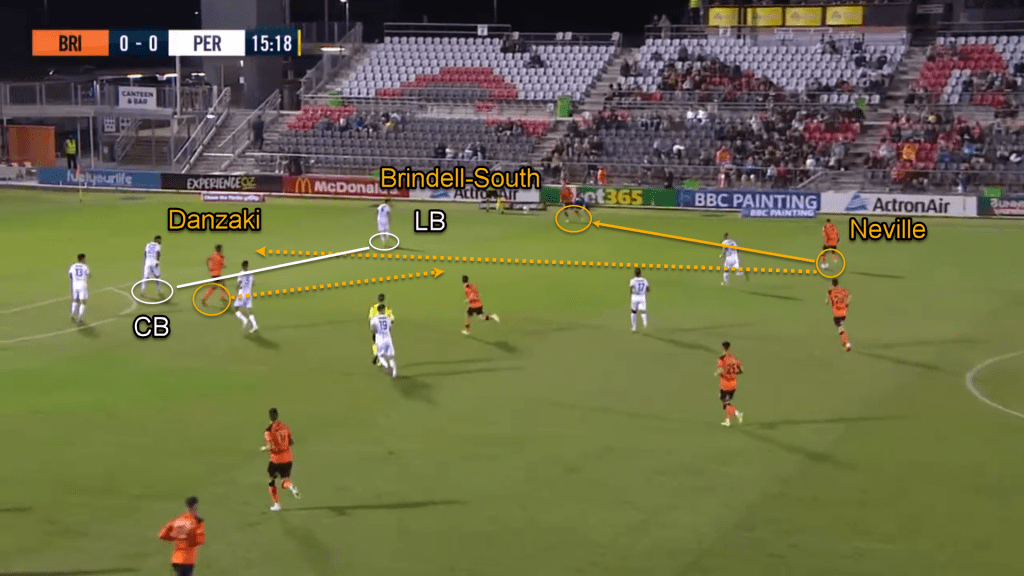
As you can see in the above picture, Neville plays the pass to Brindell-South and makes underlapping run while Danzaki moved into the half space between the opposition CB & LB.
The above wide rotations happened several times in the match as Brisbane was targeting the space between the opposition left centre-back and left back.
Attacking play
Warren Moon has improved Brisbane’s attacking play this season. As compared to last season’s 1.14 goals per match, the team has scored 1.37 goals per match this season. However, they have slightly underperformed their xG of 41 goals and have scored only 37 this season.
Brisbane relied more on direct play after they were able to build-up from the back. The defenders looked to play diagonal long passes into the wide channels, looking to hit the wing backs.
While Brisbane sat deep during spells of opposite possession, they looked very dangerous on the counter-attack and got their reward in the 73rd minute when Dabzaki scored as you can see in the above video. Their aim was always to move the ball quickly with fast combination play to draw opposition players in which would create space out wide on the flanks to spring counter attacks. Brisbane tend to create space centrally as well for the attackers to roam in while their overlapping full-backs and wing-backs come in to play.
The likes of Champness and Danzaki are vital for such a style of play as they are excellent at carrying the ball upfield at pace while the wingbacks, Brown and Brindell-South provided support from wider areas. Wenzel-Halls, who with his exceptional work rate, led the front line and kept the central defenders occupied.
Along with these players, one of the central midfielders, usually O’Shea, would push up to join the attack while Akbari would stay back to guard the defenders. In this match, it proved to be an extremely effective way for them to create chances and score goals.
Sydney FC dominated and created plenty of chances throughout the whole match against United in the Hyundai A-League. It remained 0-0 till the half-time break although they took 16 shots on goal to United’s two, but the opposition goal-keeper Ryan Scott kept them in the game by pulling off several top-quality saves.
In this tactical analysis, I will analyze Sydney FC’s build-up and attacking play tactics in the first half against Western United.
Line-ups
Western United: 1-3-4-2-1 Sydney FC: 1-4-2-2-2
Manager: Mark Rudan Manager: Steve Corica
Western United lined up in a 1-3-4-2-1 formation in which Brendan Hamill and Iker Guarrotxena made their way into the starting line-up. In possession, United set up in a 1-3-4-2-1 structure. Tomislav Uskok operated as a single pivot in front of the three centre-backs. Dylan Pierias and Connor Pain played as wingbacks providing the width for United. Victor Sanchez, Alessandro Diamanti, Guarrotxena and Uskok played in a 4-men diamond midfield while Lachlan Wales played as a single striker up top. While being out of possession, United defended in a mid-block 4-4-2 or 5-4-1 structure depending on the number of players Sydney used in their build-up play.
Sydney FC lined up in a 4-2-2-2 formation in which Luke Brattan and Trent Buhagiar made their way into the starting line-up. In possession, Sydney set up in a 1-3-1-4-2 structure while without the ball they defended in a 1-4-4-2 structure with the wide midfielders tucked in, forming a narrow 1-4-2-2-2 shape.
Sydney FC’s build-up & attacking play
The Sky Blues like to play out from the back and maintain a very narrow structure while in possession, hence keeping 55.8% possession. Their 4-2-2-2 shape is very fluid and changes according to the opposition. It helps all players to play different roles comfortably. This shape in possession increases the number of combination plays in the centre due to the high number of players operating in between the lines. Sydney adopts a very slow and patient build-up play and spends most of their time in the middle third. To get into the final third they like to penetrate through the central lanes by quick combination play or through long balls hit over the top of the opposition full back into the wide channels.
Rotations in defence
Sydney moved the ball around in defence between the two centre-backs, Ryan McGowan and Alex Wilkinson with the two men in front of them, Luke Brattan and Anthony Caceres, before finding the right angles to progress the ball further up the field.
Brattan or Caceres would often drop in between or next to the centre-backs, to form a back three when building up from the back while the other would remain in front as a single pivot which would also allow the fullbacks to push higher and provide the width. This would allow Brattan or Caceres to receive the ball facing forward. The width provided by the fullbacks’ forces opposition to decide on whether – 1. To leave the fullbacks free on each side and cover the middle, 2. To cover space horizontally and leave the central passing lanes open to the players operating in between the lines, that is when Sydney decides on how to progress the ball into the final third.
United found it difficult to press Sydney high up the pitch because the opposition always had numbers around the ball, providing passing options. The Sky Blues always had a numerical superiority in their defensive and middle third, which helped them in progressing the ball forward easily. Thus, United sat back in a compact defensive block and hit the opposition on the counter with the help of their veteran playmaker Diamanti.
Direct Play
Sydney also adopts a direct playing style approach, which means moving the ball forward at a quick pace. Because of a compact structure while defending they were able to recover a lot of balls via their midfielders which would cause in many chances for an offensive transition through direct play. It proved quite effective for them as they have two strikers who can be a direct outlet for the defenders and midfielders. The transition via direct passes allows strikers to receive the ball into the feet, in behind the opposition defence or hold up play to allow others to join the attack, which gives them a big advantage over their opposition.
Whenever United tried to press high, Sydney would switch to direct play, allowing them to gain territory over the opposition and also relieve pressure by finding the strikers immediately. Thus, it would act as a trigger for others to move up the pitch and join the attack to overload in the final third. United always left their 3 centre-backs at the back and Sydney would keep their two strikers and Barbarouses along with them to keep the opposition back line engaged. Hence, Sydney created plenty of opportunities because of the amount of space behind United’s defence.
Playing in between the lines
Sydney has a very narrow approach in attack which is complimented by the structure the operate in. The biggest advantage of this approach is the presence of players in between the lines which makes it really hard for the opposition to defend against. The Sky Blues like to overload the midfield which gives their playmakers passing options and help the team in progressing forward from the middle to final third frequently augmented by their combination play in between the lines. They also like to deliver crosses to create chances from the wide areas as well when they cannot penetrate through the middle.
The Sky Blues were up against a resolute Western United defence who tried to block Sydney’s central progression and force them towards the wide areas. Sydney was not afraid to commit men forward. The Sky Blues possess players like Ninkovic and Barbarouses who are capable of playing in between the lines. The constant movement of drifting in and out from these players and their link-up play with Bobo and Buhagiar helped in disorganizing the opposition.